 I am excited because it’s time for the monthly share from our no-sew group and this time the theme is EASTER! I can already see from what’s catching my eye that I am going to be working around a theme...carrots! Yes, I know…weird, huh? But for some reason I am really loving carrots so this may be the first of several carrot-y projects! lol
Here’s what you will need:
- Green felt squares
- 1/4 yard of orange felt (Squares won’t work for this part of the project)
- Paper towels
- Tape
- Hot glue gun
 And here’s what you will do:
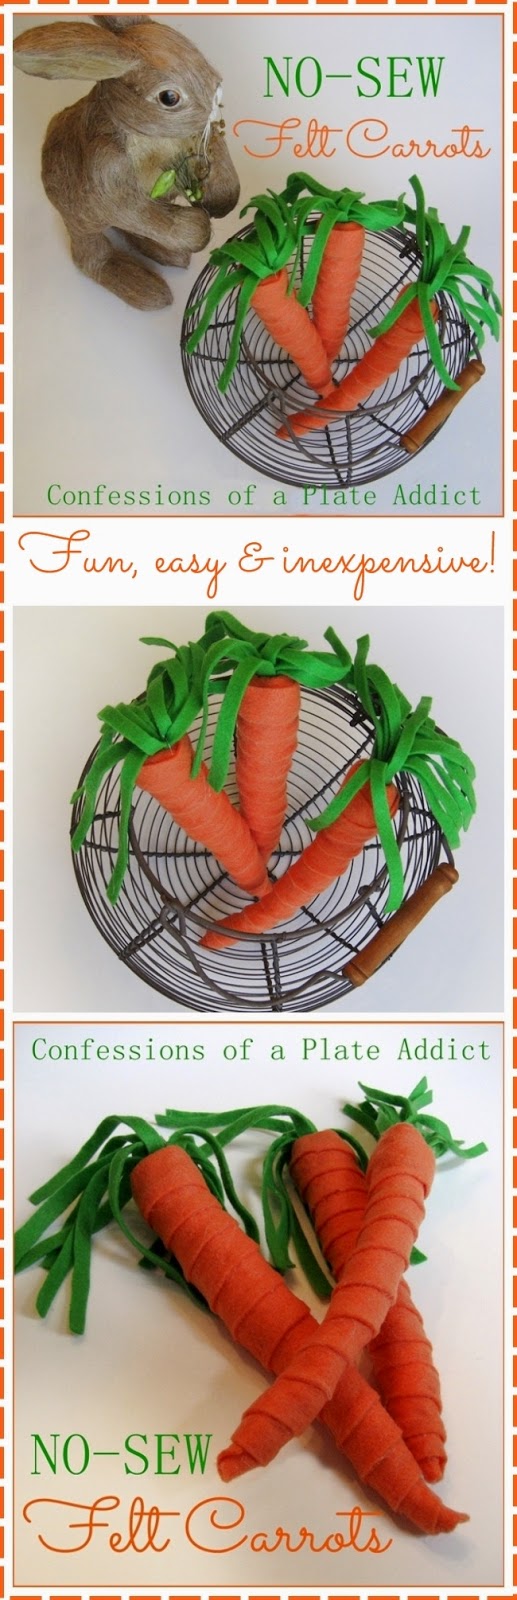
1. Begin with several paper towels (I used three for larger carrots and two for smaller ones) to form your carrot base. I first folded them in half lengthwise, then folded the top third down to create a fatter top section. Next, I twisted them into a carrot shape and finished them off by wrapping tape around them to hold the shape. I stopped about 1/2 inch before the top of the “carrot” and then trimmed off the excess paper towel to create a flat top.
2. Cut a 5 inch x 5 inch square of green felt and cut into smaller strips, stopping about 1/2 inch before the bottom of the felt. Then wrap them tightly and hold with a dot of hot glue.
3. Cut a square of orange felt large enough to cover the top of your carrot and allow for a drop. (Mine are 2 inches x 2 inches.) Then cut a small slit in it and slip the carrot top through it.
 4. Create a 1/2 inch indentation in the center of flat top of your carrot base and add a small dot of hot glue. Place the green top in the indentation and hold in place until it’s secure. Then glue the four corners of the orange square to the base with a dot of hot glue. (I always use a bamboo skewer while working with hot glue to avoid burns.) Next, cut a slit in the middle of one of the four sides, lapping one side over the other and hot glue in place. Repeat for the other three sides.
5. Now you are ready to wrap your carrot base. Cut a strip of orange felt 3/4 inch wide and approximately 45 inches long. You may not need the entire strip but you don’t want to have to piece it. Begin at the bottom, wrapping and securing with small dots of hot glue as you go.
6. Once you reach the top, cut the felt so that it is rounded and then wrap and glue in place.
7. Here's the finished product! Mine are all about 8 inches long, not counting the tops, and vary in "fatness" by the number of paper towels that I used.

 Baby Kitty, however, is more interested in the bunny! Yikes!
 And just in case you missed it, I showed you how they look in my simple Easter centerpiece, starring the Easter bunny himself!
 And if you would like even more fun and easy ideas, here are 10+ no-sew projects with bunnies and burlap for spring! There’s a little bit of everything so I hope you’ll hop on over and take a peek!

Amy at Atta Girl Says...Pottery Barn Knockoff Easter Bunny Banner
Yvonne at StoneGable...No-Sew Burlap Flower Pillow
Remember to pin it!


Thanks for stopping by! Please visit these wonderful bloggers and their beautiful blogs to see what they are up to and to find a list of this week’s participants.
Under the Table and Dreaming for the Sunday Showcase Party , Thrifty Decor Chick for Before and After Monday , Between Naps on the Porch for Metamorphosis Monday , The Stories of A2Z for Tutorials and Tips Tuesday , Coastal Charm for the Show and Share Party , A Stroll thru Life for Inspire Me Tuesday , My Uncommon Slice of Suburbia for Inspire Me Monday, Savvy Southern Style for Wow Us Wednesdays , French Country Cottage for Feathered Nest Friday , Common Ground for Be Inspired on Fridays , The Charm of Home for Home Sweet Home Friday , Craftberry Bush for the Inspiration Gallery on Friday, Tatertots & Jello for the Link Party Palooza on Fridays
See you next time! À la prochaine!
Also find me at…
0 comments:
Post a Comment